76% of consumers get frustrated when companies don’t use content personalisation. In 2022, consumers expect to be treated like an individual regardless of whether it is at their local cafe or corner shop, or on the online stores they visit.
Personalisation enables you to deliver targeted content to your visitors, helping customers find what they are looking for, as well as to discover relevant products or services that they might not have even known about.
And it’s good for business too.
According to Econsultancy’s ‘Conversion Rate Optimization Report’, 94% of companies that personalise their websites have experienced a rise in conversion rates after implementing it.
It might be a no-brainer to take the plunge, but many companies struggle to get started with website content personalisation. How can the process be made easy, then?
Sitecore is one of the industry’s leading Digital Experience Platforms (DXP) and has a host of features that can enable any company to get their personalisation strategy off the ground.
For example, you can implement rules that show personalised content to visitors based on their browsing behaviour or contextual cues like their geolocation or whether they reached your website from a campaign ad.
With Sitecore’s Experience Editor feature, you can create personalisation rules to determine which content is shown to different site visitors based on many different criteria, including goals, campaigns, engagement plans, and profile value points. Your website responds to personalisation rules in real time by showing specific content, by hiding content, or by adjusting the behaviour of a component.
For businesses looking to show their visitors relevant content and product suggestions, it’s an easy sell. But many clients don’t know where to start.
Even some clients who actually have a Sitecore licence can find it challenging to get going.
But it doesn’t have to be that difficult. In just a few quick steps, you can begin your content personalisation journey.
The first step in personalising your website is to pick a component that you want to adapt based on some visitor criteria.
This could be a whole component like the Homepage header banner, or it could be something more subtle like an image, piece of copy, or Call to Action (CTA).
You can adapt basically any part of the site but feel free to pick just one component for now if you’re just getting started.
Give some thought as to why that section in particular might benefit from having different content for one visitor compared to another.
For example, your Homepage header banner is a valuable piece of website real estate and, as such, is a prime area for personalisation. A common use case is to adapt this component based on whether it is a user’s first visit to your website or a return visit.
For a first visit, you might want to include a brand message in the header banner telling your visitor what you’re all about. But for a return visit – when the user should already know about your business – you might want to feature a more tactical message like an offer or information about a particular product.
Once you’ve decided which section you want to personalise, the next step is to create an alternate version of that component in the system.
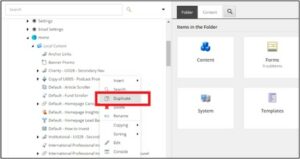
Go into the Content Editor section of your Sitecore dashboard and find the component you want to personalise. Simply right-click on the component in the left panel and select Duplicate.
Next, click on the new component and give it a new name to reference who you will be personalising it for. Then change whatever content you want to show them – this can be an image, the headline, body copy, CTAs or links etc.
Now we need to create a trigger that will tell the system who to show the new component version you just created to.
There are multiple ways you can trigger personalisation within the Sitecore platform, from user Profile / Persona matches, Campaign codes or Goals that align to actions users can take. For this example we will be using a Goal.
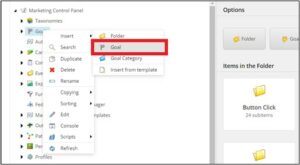
For this, go into the Marketing Control Panel of your Sitecore dashboard and right-click on Goals. Click Insert and select Goal. Give the Goal a name and add 1pt to it in the Points field for now. How many points you add here depends on how strong of a signal you want this Goal to be in relation to other Goals. Because we only haveone Goal for this example, we’ll only use 1pt just to show how it works.
Once you’ve created the Goal, now you have to link it to an action such as a page view, button click, contact form submission, newsletter sign-up, asset download – basically anything a user can do on the site. For this example, we will link it to a brochure download.
What we ultimately want to do is set it up so that a user that downloads a product brochure then sees a personalised header banner with a product-specific offer when they next visit the Homepage.
So, now that we have our Goal created, we need to go back into the Content Editor, find the component with the brochure download button in it, click the Primary CTA Goal field and select the new Goal that you have just created. Viola!
Now that we have our new component version created, as well as the Goal that will trigger who should see it, now we need to create a content personalisation rule for when and where to show the new component.
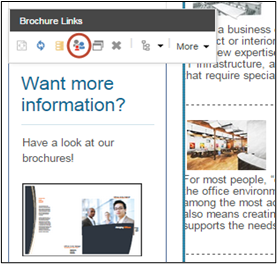
To do so, go into the Experience Editor of the Sitecore dashboard, navigate to the component that you want to personalise and click the Change Condition icon (below) and select Edit Conditions in the dropdown.
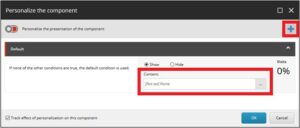
In the pop-up box that opens, click the + icon in the top right corner to add a new personalisation rule. Give it a relevant name (e.g. Downloaded Brochure) and in the Content field in the centre of the box, select the new component version that you just created.
Now we need to add the actual personalisation rule itself. To do so, click the Edit Rule button.
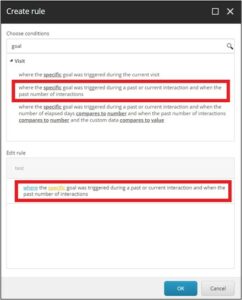
The Choose Conditions field is where we will link our Goal and any contextual conditions for when our personalised component should appear.
There are over 110 different metrics to choose from here based on the visitor, visit, campaign, date, geolocation etc. and countless variations on these offering incredible flexibility.
For our example, we will choose the rule “Where the specific goal was triggered during a past or current interaction” in the Visit section.
Click on the rule and customise it in the Edit Rule field. All we have to do here is click “specific goal” and choose the Goal you just created in the Marketing Control Panel.
Now when a website visitor downloads the product brochure in question, they will see the product-specific header banner the next time they visit the Homepage. And, with any luck, this will nudge them further down the purchase journey.
And there you have it. In just a few short steps that shouldn’t take more than 10 or 15 minutes you’ll be on your way. But don’t stop there. This exercise is merely to get you thinking about how you can use personalisation to supercharge your own business. Experiment with different versions of components with different images, copy, and calls-to-action, and A/B test them to see which works best. With Sitecore you have all the tools you need to become a personalisation master.
If you want to find out more, or discuss anything related to Sitecore Personalisation, feel free to reach out. We’re a Sitecore Agency with over 20 years experience delivering experiences that convert, powered by Sitecore. As your Sitecore Partners, we’ll talk you through how Sitecore can help you reach your goals.